Start Using PagerDuty Today
Try PagerDuty free for 14 days — no credit card required.
The Desk.com PagerDuty App allows you to trigger incidents within PagerDuty. This allows you to send notifications to your team even if it’s after hours. The PagerDuty system allows you to define how and when members of your team should be notified. If you are having trouble completing the installation, please contact us.
Please note that if you’d like to 1) auto-resolve incidents in PagerDuty when a Desk.com ticket is closed 2) display the content of tickets in PagerDuty incidents or 3) push tickets with specific conditions to different escalation policy in PagerDuty, you will need to create a generic email integration. Instructions on the email integration can be found at the bottom of this integration guide.
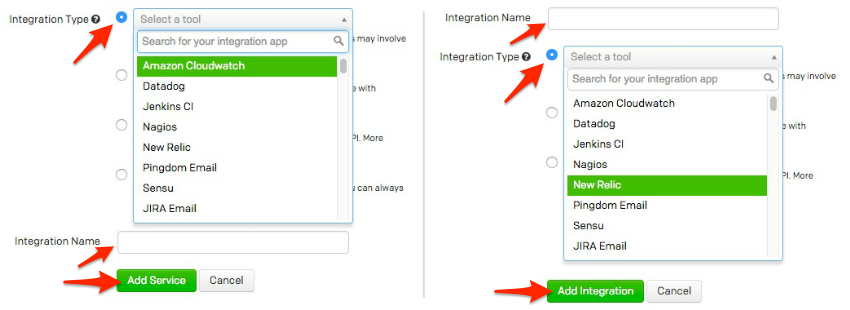
If you are adding your integration to an existing service, click the name of the service you want to add the integration to. Then click the Integrations tab and click the +New Integration button.


A Business Rule fires when a certain Event occurs (e.g. a Case is Updated) and the conditions specified for that case evaluate to be true. In our example, we will fire the rule to post the Case Updated message on an Updated Case Interaction with an All Condition requiring the label “send to pagerduty“, and then remove that label at the conclusion of that rule. This way the PagerDuty Message will not be sent until that label is added again.
In addition, this rule will run at any time (not just during Business Hours). You can use the Advanced Edit to make sure your rule is enabled, and you can also view this rule in the Admin > Case Management > Rules section of Desk.com’s Admin. Make sure Enabled is checked, and then click Update once you have completed filling out the form.
Congratulations! Your Desk.com PagerDuty App is now integrated with PagerDuty!
When you update a case in Desk.com by adding the label “send to PagerDuty“, the Rule will evaluate to be true, and the Action will fire to send a PagerDuty Message using your PagerDuty account. PagerDuty will then take over and notify the contacts you’d like to notify as per the escalation policy that you specify in PagerDuty.
I.Create a Generic Email Service in PagerDuty
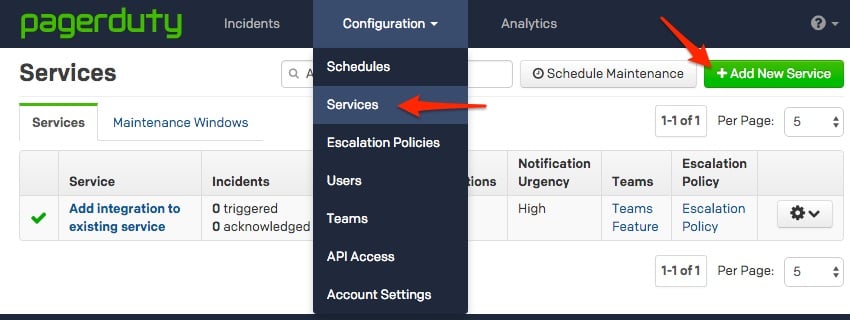
Begin by creating a generic email service in PagerDuty. Go to Configurations > Services > + Add New Service.
From there you’ll need to:
II. Setup Notifications
Next, navigate to the Admin section of your Desk.com instance and add a new theme within Notifications.
Name your new theme and click Add.
Next, edit the email template by entering the email integration address you created in your PagerDuty service.
III. Create Rules in Desk.com
In the example below I’m going to tell Desk.com to send an email to PagerDuty anytime a new ticket is created.
If you already have Rules created, you can simply edit them.
If you do not yet have rules added, click on Cases at the top and Case Created on the left. Then click Add Rule and give your rule a name.
When creating rules, think about what type of tickets you want to push to PagerDuty. For example, you may only want to send tickets that have a certain priority to PagerDuty, or tickets assigned to particular groups. To do this, you can specify the conditions in the Desk.com rule.
Once you have established these condition(s), tell Desk.com to send an email to your PagerDuty integration address.
Choose Send Notification Emails and then choose the notification you previously created. Make sure to Enable your rule and then click Update.
Since you’re going to be auto-resolving incidents in PagerDuty, you also need to set up a Case Resolved rule – this will send a notification to PagerDuty when a ticket has been resolved.
Choose Send Notification Emails and then choose the notification you previously created. Make sure to Enable your rule and then click Update.
Now that you have Desk.com configured, return to PagerDuty and set up your email parsing rules – these rules will allow PagerDuty to auto resolve incidents.
IV. Set Up Email Parsing Rules
To create email parsing rules, navigate to your Desk.com PagerDuty service and go to Edit.
 Under Email Management chose Create and resolve incidents based on custom rules.
For this particular demo, in the first rule you want PagerDuty to trigger an incident if a Desk.com ticket contains Status: New in the body. (Again, you may choose to specify different conditions based on your use case.)
Next you’ll create the incident key which will be used to append new emails to existing ones. The incident key should always be a unique identifier that appears in both the trigger and recovery email.
If you look at the example Open and Resolved emails from Desk.com, you can see that the subject line doesn’t change – so you’ll use that as the incident key.
Once you’ve established your conditions and incident key, click +Add Another Rule
Since you want PagerDuty to close incidents when the corresponding ticket has changed to resolved, you will use “Status: Resolved” as your condition, and the same incident key that was used in the previous rule.
And there you go! PagerDuty will now auto-resolve incidents for your Desk.com integration. If you’d like to double check, you can view an incident’s Incident Log. For Case #29, you can see that PagerDuty auto resolved the incident.
If you have questions or need additional assistance, please contact support@pagerduty.com.
Try PagerDuty free for 14 days — no credit card required.