- PagerDuty /
- Integrations /
- Rackspace Cloud Monitoring Integration Guide
Rackspace Cloud Monitoring Integration Guide
Rackspace Cloud Monitoring is a web application platform that is flexible and robust. The guide below describes how to integrate Rackspace Cloud Monitoring with your PagerDuty account. By integrating with PagerDuty, you can be alerted when alarms are triggered within your Rackspace Cloud Monitoring environment. This integration is currently in beta. This means that while the Rackspace web interface is not in its final form, all alert triggering and resolution are fully functional.If you require any assistance in getting configured, please contact us.
In PagerDuty
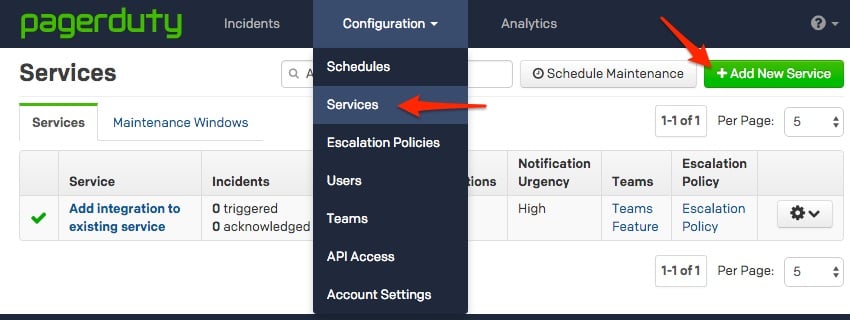
- From the Configuration menu, select Services.
- On your Services page: If you are creating a new service for your integration, click +Add New Service. If you are adding your integration to an existing service, click the name of the service you want to add the integration to. Then click the Integrations tab and click the +New Integration button.
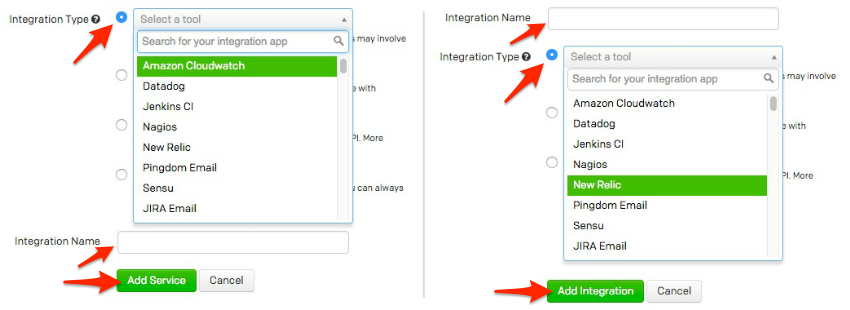
- Select your app from the Integration Type menu and enter an Integration Name. If you are creating a new service for your integration, in General Settings, enter a Name for your new service. Then, in Incident Settings, specify the Escalation Policy, Notification Urgency, and Incident Behavior for your new service.
-
Click the Add Service or Add Integration button to save your new integration. You will be redirected to the Integrations page for your service.

-
Copy the Integration Key for your new integration:
 Note: You may create multiple Generic API integrations for use with different PagerDuty policies. The Rackspace Cloud Monitoring can be aligned to any number of different PagerDuty accounts and “Generic API” integrations.


Within Rackspace Cloud Monitoring
Create the PagerDuty Notification Plan and Notifications
- Go to http://intelligence.rackspace.com and log in with your Rackspace credentials.
- Click on Notification Plans in the side bar
-
Click the “Create Notification Plan” button

-
Enter a name for the notification plan and click on Confirm. If you’re planning on having multiple plans, you will want a unique name here.

- You will be taken to view the notification plan. Click on “Add Notifications” to create and add PagerDuty notification
-
Enter a label for the notification; we used PagerDuty but if you’re adding multiple notifications you will want to add a unique label here. Select pagerduty as the notification_type. Enter your serviceKey which you obtained from step 4 under the “Within PagerDuty” section of this guide.

- Your new notification will be created and added to the current notification plan. Click on “Save Plan” to save your notification plan
- Click the check mark to save your notification plan.
-
Click on “Monitoring” link on the side bar

- Select your server that you would like to monitor
-
Scroll down to the “Monitoring Checks” section, and click on “Create Check”

-
Set up the check that you want to monitor

-
Scroll down to the “Monitoring Alarms” section, and click on “Create Alarm”

-
Enter the alarm name

- Choose the notification plan that you just created
- Enter the alarm criteria, you can click on the “Examples” tab to copy the example criteria template
- Click “Create Alarm”
- Go to https://mycloud.rackspace.com and login.
-
Select your server that you would like to monitor.

-
Scroll down to the Monitoring Checks section, and click on Create Check.

-
Select the check type that you want to monitor.

- Enter a name for your check, such as HTTP Check.
- Fill out the remaining empty fields on the form that are relavent to the Check Type that you have selected.
- Select the PagerDuty monitoring notification plan that you created earlier from the “Send Alarms to” drop-down menu.
- Click on Create Check.
Ready to get started?
Try any product on the Operations Cloud for free.
No credit card required.