- PagerDuty /
- Integrations /
- Catchpoint Integration Guide
Catchpoint Integration Guide
Catchpoint allows you to manage, monitor, and test the performance of online applications. Follow the instructions below to configure Catchpoint with PagerDuty.
In PagerDuty
- Click Services on the navigation bar.
- On the Services page:
- If you are creating a new service for your integration, click + New Service.
- If you are adding your integration to an existing service, search for the service you want to add the integration to and click into the service. Then click the Integrations tab and click Add a new Integration.
- Select your app from the Integration Type menu and enter an Integration Name.If you are creating a new service for your integration, in General Settings, enter a Name for your new service. Then, in Incident Settings, specify the Escalation Policy, Notification Urgency, and Incident Behavior for your new service.
- Click the Add Service or Add Integration button to save your new integration. You will be redirected to the Integrations page for your service.
- Copy the Integration Key for your new integration.
In Catchpoint
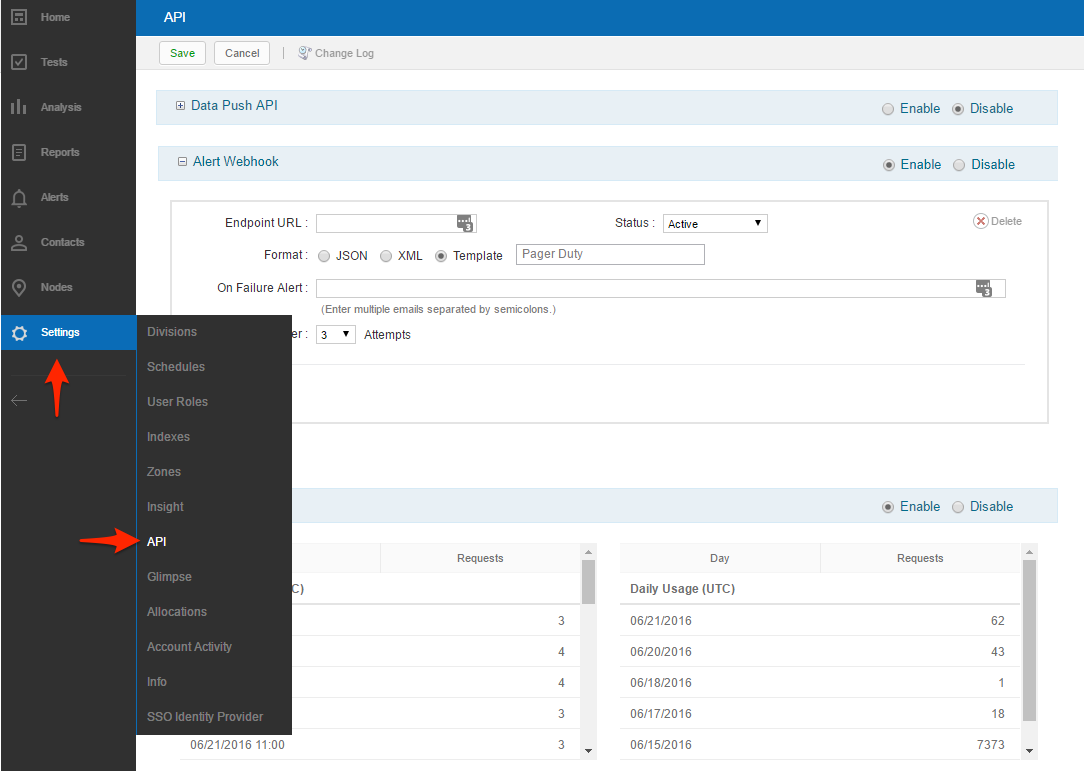
- Go to the Settings menu and select API.

- Set the Alert Webhook status to Enabled, the Status to Active, and Endpoint URL to:
https://events.pagerduty.com/generic/2010-04-15/create_event.json - Select Template from the Format options.
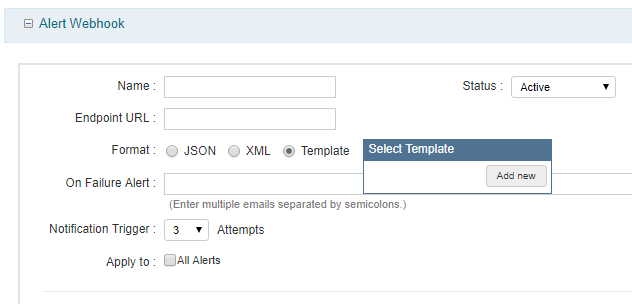
- Click Add new in the template selection drop down menu. Existing templates can be edited in the menu by hovering over the template name and selecting the Edit/View Properties icon.

- A lightbox will pop up where you can create a name for the template and define the contents. The content should be valid JSON and should include the required fields described below.PagerDuty expects valid JSON and has three required fields:
service_key,event_type, anddescription. Additional parameters that can be passed can be found in our Events API documentation.
Alert Macro Usage
The JSON fields can be hardcoded as well as filled in dynamically with data provided from the system. This includes data like the test name, the alert severity, conditions that triggered the alert, location of the node for which a test run caused an alert to trigger, etc. An example use for the Alert Webhook Template is to provide the timestamp and severity level for an alert in JSON where macros are used with the following syntax: ${macroName}.
{
"service_key": "YOUR-INTEGRATION-KEY-HERE",
"event_type": "${switch("${NotificationLevelId}","0","trigger","1","trigger","3","resolve")}",
"description": "${switch("${NotificationLevelId}","0","WARNING","1","CRITICAL","3","OK")}: ${TestUrl}",
"incident_key": "${AlertInitialTriggerDateUtc}",
"client": "${TestName}",
"client_url": "${TestUrl}",
"details": {
  "NodeName": "${NodeDetails("${NodeName}")}",
  "NodeClientAddress": "${NodeDetails("${NodeClientAddress}")}",
  "NodeMean": "${NodeDetails("${NodeMean}")}",
  "Test Name": "${TestName}",
  "Test URL": "${TestUrl}"
  }
}
Alert Macro Index
A list of all the supported alert macros can be found in the Catchpoint Knowledge Base.
Note: You must log in to your Catchpoint account to access their knowledge base.
FAQ
Can Catchpoint integrate with multiple PagerDuty services?
Yes, Catchpoint can route different alerts to separate PagerDuty services by sending specific alerts to different endpoints.
Will incidents triggered by Catchpoint automatically resolve?
Yes, Catchpoint can auto-resolve PagerDuty incidents by applying the switch statement within the event_type field to send a resolve when the notification level is 3 or Improved.
Ready to get started?
Try any product on the Operations Cloud for free.
No credit card required.