- PagerDuty /
- Integrations /
- Aruba ClearPass Integration Guide
Aruba ClearPass Integration Guide
In PagerDuty
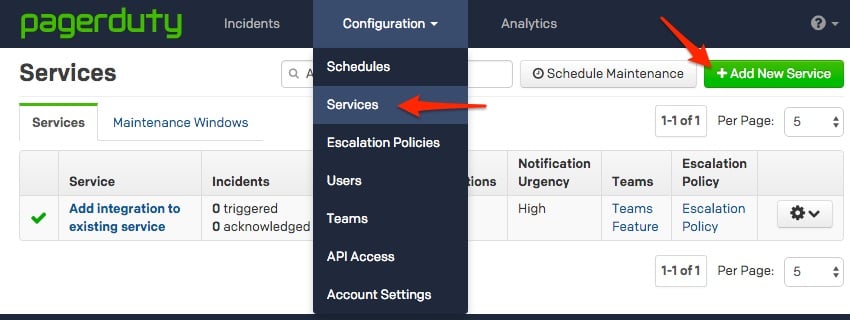
- From the Configuration menu, select Services.
- On your Services page: If you are creating a new service for your integration, click +Add New Service. If you are adding your integration to an existing service, click the name of the service you want to add the integration to. Then click the Integrations tab and click the +New Integration button.
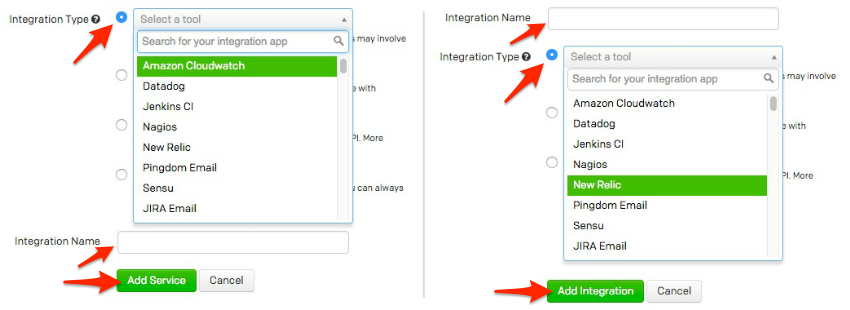
- Select your app from the Integration Type menu and enter an Integration Name. If you are creating a new service for your integration, in General Settings, enter a Name for your new service. Then, in Incident Settings, specify the Escalation Policy, Notification Urgency, and Incident Behavior for your new service.
- Click the Add Service or Add Integration button to save your new integration. You will be redirected to the Integrations page for your service.

- Copy the Integration Key for your new integration:

- Go to the ClearPass Solutions Exchange PagerDuty page and in the "PagerDuty API credentials" tab, enter your integration key:

- In the Create Event Template tab, enter your ClearPass fully qualified domain name (FQDN) or IP address, as well as your Event Message and Trigger Action Name.

- From the Configuration tab download the generated XML configuration files that include all the details specific to your deployment. The following configuration files should be available to download: CPPM 6.3 Endpoint Context Server Import Config.xml and CPPM 6.3 Enforcement Profile Config.xml.
- From the ClearPass Policy Manager administrative user interface, browse to the Administration > External Servers > Endpoint Context Servers page and click on the Import Context Servers button shown in the top right hand corner.

-
From the Import from file window, select the configuration XML file downloaded from the previous step and then click the Import button. The result of the import should show that a new Endpoint Context Server and Context Server Action were both successfully created.

-
In order to take advantage of this new ClearPass Exchange API definition as part of a dynamic policy enforcement, a new Enforcement Profile needs to be created to take advantage of this API integration. From the ClearPass Policy Manager administrative user interface, browse to the Configuration > Enforcement > Profiles page and click on the Import Enforcement Profiles button shown in the top right hand corner.

-
From the Import from file window, select the configuration XML file downloaded from the previous step and then click the Import button. The result of the import should show that a new Generic Enforcement Policy was successfully created.

-
ClearPass Exchange now allows customers to extend their business rules to include policy enforcement beyond just the network and integration with all sorts of 3rd party systems to create new and engaging workflows for enterprise users. Looking at an existing Enforcement Policy rule below, we can see that the new HTTP based enforcement profile can be easily added along side the existing network centric RADIUS enforcement policy.


In ClearPass
In this example the business rule being enforced is trigger by a device connected that has been determined to not be no longer enrolled in the enterprise MDM solution and the device is being quarantined using RADIUS (Enforce MDM Enrollment) and redirected to the MDM enrollment workflow. ClearPass Exchange is adding to this network enforcement by also triggering an outbound event notification (Create PagerDuty Event Trigger) which will be routed to the appropriate escalation resource within the PagerDuty system. Based on the PagerDuty user's configuration options, the alert may be delivered via email, SMS, Push notification, phone call or a combination of these options.
For more information on implementing your business rules as part of ClearPass Enforcement Policies, please refer to the User Guide.
Ready to get started?
Try any product on the Operations Cloud for free.
No credit card required.