- PagerDuty /
- Integrations /
- CloudWeaver Integration Guide
CloudWeaver Integration Guide
This integration requires use of our v1 REST API which is currently in a decommissioning period, please contact support to gain access to a v1 REST API key to configure this integration.
For more information about the v1 REST API deprecation take a look at our FAQ here: https://v2.developer.pagerduty.com/v2/docs/v1-rest-api-decommissioning-faq
We are working with partners to upgrade integrations to use our v2 REST API.
CloudWeaver provides an easy way to inventory and manage your cloud infrastructure. It automatically visualizes and documents your AWS infrastructure and services all across regions in minutes. All the notifications that CloudWeaver creates can also be sent to your PagerDuty account.CloudWeaver sends notifications when any of the following events occur:
- An infrastructure alarm is raised (e.g., CPU Load over 0.9, TCP RTT over 5 ms)
- An infrastructure alarm is lowered (e.g., CPU Load back under 0.9, TCP RTT back under 5 ms)
- Successful completion of an action (e.g., installing a sensor)
- Failure to complete an action (e.g., upgrading a sensor)
In PagerDuty
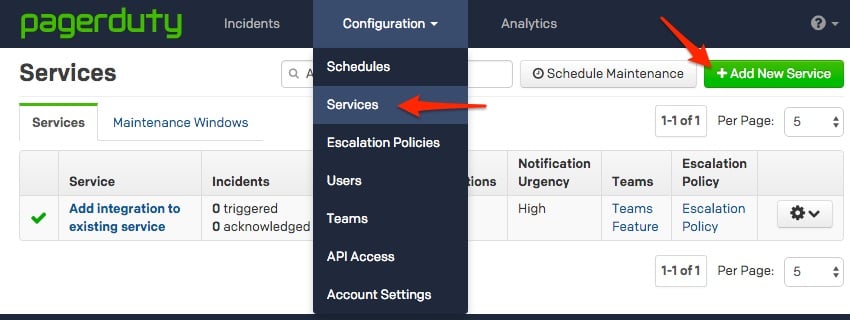
- From the Configuration menu, select Services.
- On your Services page:If you are creating a new service for your integration, click +Add New Service.If you are adding your integration to an existing service, click the name of the service you want to add the integration to. Then click the Integrations tab and click the +New Integration button.


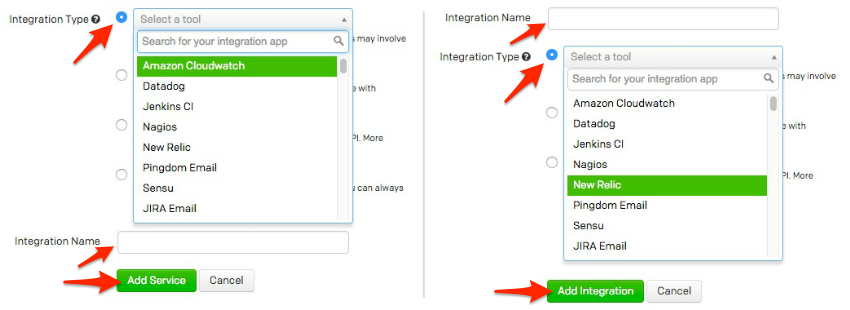
- Select your app from the Integration Type menu and enter an Integration Name.If you are creating a new service for your integration, in General Settings, enter a Name for your new service. Then, in Incident Settings, specify the Escalation Policy, Notification Urgency, and Incident Behavior for your new service.
- Click the Add Service or Add Integration button to save your new integration. You will be redirected to the Integrations page for your service.

- Copy the Integration Key for your new integration:

- From the Configuration menu, select API Access.

- On your API Access page, click the +Create New API Key button.

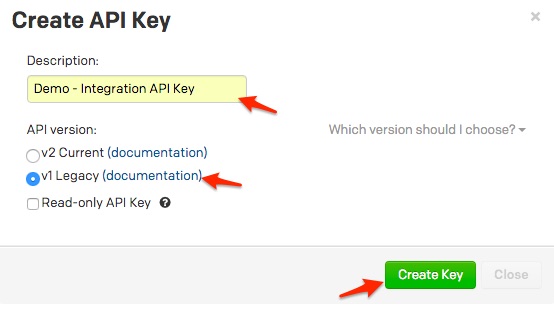
- In the dialog that pops up, you'll be prompted to enter a Description for your key, and choose an API version. You will also have the option to create the key as Read-only; leaving this box unchecked will create a full access key.
 A note about versioning: API v2.0 is designed to make it easier for new integrations to communicate with PagerDuty. Most existing PagerDuty integrations will require an API v1.0 key. If you have questions on which API version to use, please contact support@pagerduty.com
 - Once you have filled in your options, click Create Key.
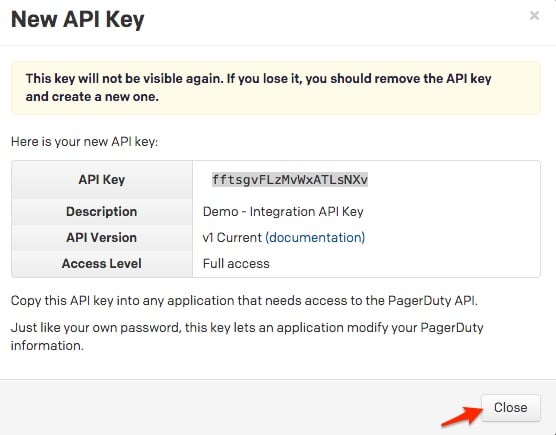
- Once you click Create Key, you will see a dialog displaying your key and confirming the options you filled in on the previous step. Make sure to copy this key into any application that needs it now, as you will not have access to the key after this step. If you lose a key that you created previously and need access to it again, you should remove the key and create a new one. Click Close once you have successfully copied your key.

In CloudWeaver:
- Go to the Notifications tab (Bell), then click the Enable checkbox under the PagerDuty section. Enter your PagerDuty API Access Key and Service Integration Key. Click on the Save button when complete.

An alert in CloudWeaver:
Corresponding Alert in PagerDuty:
Ready to get started?
Try any product on the Operations Cloud for free.
No credit card required.

