- PagerDuty /
- Integrations /
- Honeybadger Integration Guide
Honeybadger Integration Guide
Honeybadger is an error management suite for Ruby on Rails applications. It collects error data from your application and displays it in a user-friendly format that makes tracking down and resolving issues faster and easier. By combining Honeybadger with PagerDuty, you can distribute information about these errors to your team through alerts and fix problems in record time.
Follow these instructions to configure Honeybadger with PagerDuty. If you have any questions or require assistance, please contact our support team.
In PagerDuty
- From the Services menu, select Service Directory.
- On your Services page: If you are creating a new service for your integration, click + New Service. Then in General Settings, enter a Name for your new service and in Incident Settings, specify the Escalation Policy, Notification Urgency, and Incident Behavior for your new service. If you are adding your integration to an existing service, click the name of the service you want to add the integration to.
- Click the Integrations tab and click the Add a new integration button or select it under Integration Settings if setting up a new service.
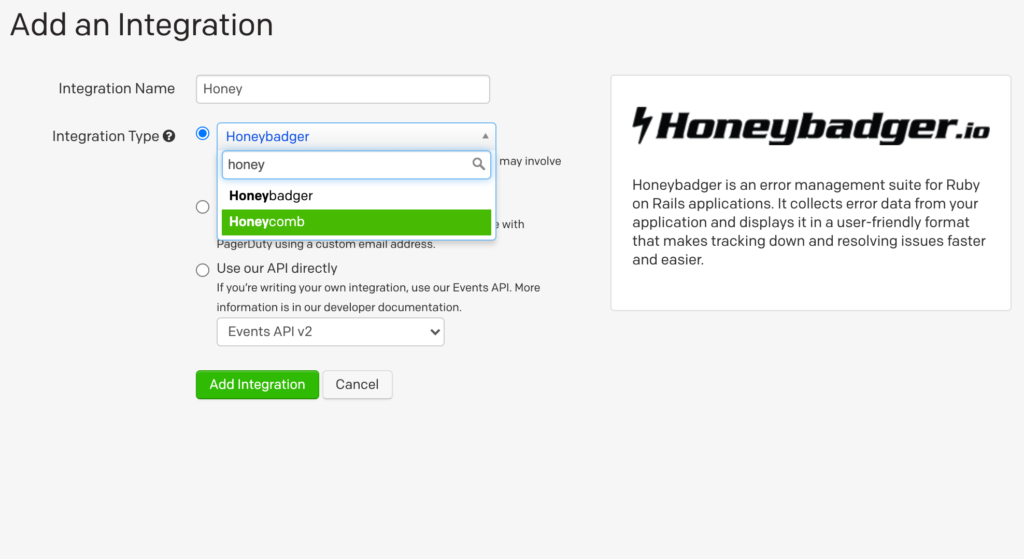
- Select your app from the Integration Type menu and enter an Integration Name.
- Under Select a tool, choose Honeybadger
- Click the Add Service or Add Integration button to save your new integration.
- Go to your service's integrations page and copy the Integration Key (API key) for your new integration
In Honeybadger
-
-
- Within the Honeybadger console, select My Projects.
- Select Add A Project.
- Enter in the relevant information and create your project.
- Create a site if you haven't already created one. For this integration guide I created a Rails app using
rails generate honeyroku Post title:string body:text
and deployed it to Heroku. - Follow the instructions as they apply within your environment to create a test alert.
- In this example, after running
rails generate honeybadger --api-key [your_key]
you should see a confirmation within your environment. - Check your Errors page to confirm that a test error was successfully generated.
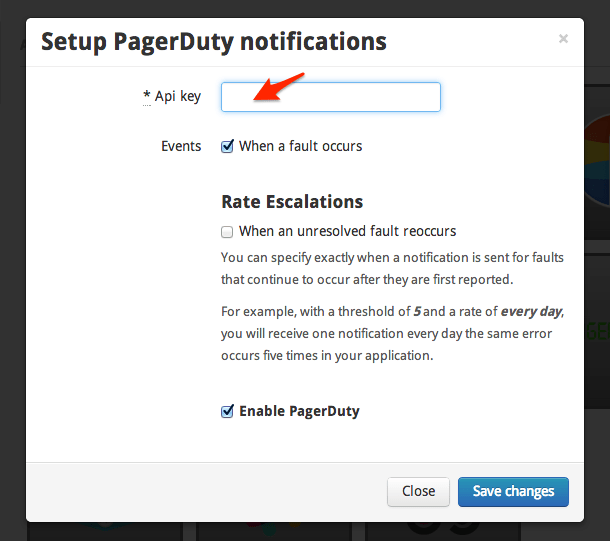
- Under the Settings tab, select Integrations.
- Select PagerDuty.
- Enter the Integration Key you copied from PagerDuty in the API key field and click Save changes.
- Introduce an error inside your application. In this case, I changed the working Activerecord method
post.destroy
to the undefined methodpost.mestroy
. I then committed the error to git, pushed it to Heroku, visited my site and clicked Destroy next to a post on the Posts index page. - Verify that the error has appeared on your site.
- Check for the error in Honeybadger.
- Ensure that the PagerDuty integration has worked by checking for the incident in your account, if you haven't already been notified by phone, SMS or email.
-
FAQ
Can I attach multiple projects within Honeybadger to multiple services within PagerDuty?
Yes, simply create multiple Honeybadger services in PagerDuty and configure each Honeybadger Rails project to use the desired integration key.Ready to get started?
Try any product on the Operations Cloud for free.
No credit card required.