- PagerDuty /
- Integrations /
- ScienceLogic Integration Guide
ScienceLogic Integration Guide
This integration requires use of our v2 REST API.
This is designed to help administrators integrate ScienceLogic SL1 system with PagerDuty’s Incident Management SaaS service. This guide will help prepare you for the integration tasks. If you are having trouble completing the installation, please contact us.
Prerequisites
- Requires ScienceLogic SL1 version 8.4.0 or later
- Requires administrative accounts for both products
Integration Steps
To integrate PagerDuty with ScienceLogic the following steps will be required:
- Create PagerDuty API Service
- Import PagerDuty Power-Pack into ScienceLogic system
- Create credential for PagerDuty API
- Align ScienceLogic Run Book Automation policies
- Advanced Integration (optional)
It is recommended that you familiarize yourself with the ScienceLogic Run Book Automation (RBA) functionality before activating the PagerDuty Power-Pack. The default PagerDuty RBA policies are very broad and will create new PagerDuty incidents for every event in ScienceLogic that is of severity minor, major, and critical.
Understanding the Integration
The ScienceLogic PagerDuty integration Power-Pack offers several key functions:
- Run Book Automation policies to trigger, resolve, and acknowledge events from ScienceLogic to PagerDuty.
- Dynamic Application to collect PagerDuty performance metrics, and synchronize incidents acknowledged from PagerDuty.
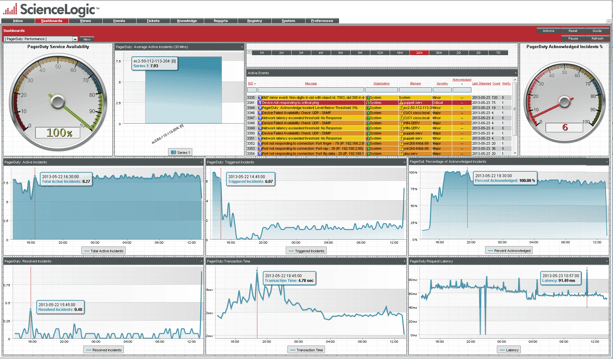
- PagerDuty performance KPI dashboard with historical dynamic trending.
- PagerDuty example credentials for both Run Book Actions and Dynamic Applications.
- PagerDuty device classes and icons for both Pingable and Virtual devices
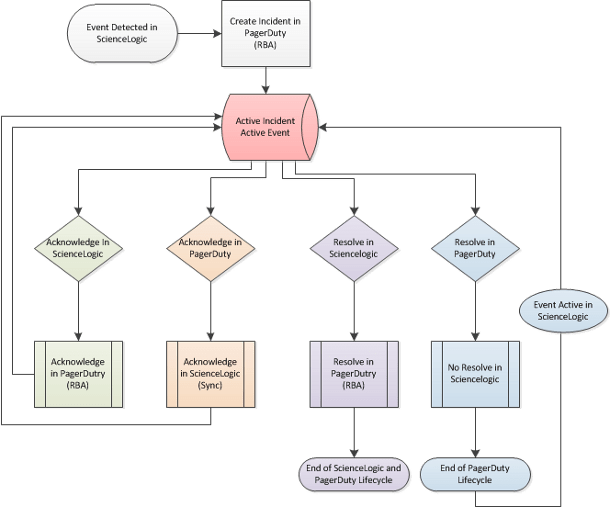
The PagerDuty integration relies on Run Book Automation policies to “push” both events and related event actions to PagerDuty. Activities emanating from PagerDuty, for instance, acknowledging an incident, are synchronized through a Dynamic Application. The following diagram shows the dataflow for how ScienceLogic events and PagerDuty incidents are synchronized.
Incidents resolved in PagerDuty will not automatically resolve events in ScienceLogic. This is because most events in ScienceLogic will automatically resolve themselves if they are no longer active or detected. For instance, if a monitored device is detected as being unavailable, ScienceLogic will create an event, and then create an incident in PagerDuty. If the incident in PagerDuty is resolved but the device is still detected as being unavailable, ScienceLogic will automatically create another event and PagerDuty incident. However if the incident is resolved in PagerDuty, but the event still remains in ScienceLogic, duplicate events will be suppressed. Once the event is no longer valid, ScienceLogic will automatically resolve the event and update the incident in PagerDuty.
In PagerDuty
We will create a PagerDuty API integration in the PagerDuty web portal for the ScienceLogic Run Book Automation integration. We will also add an API access key for ScienceLogic Dynamic Application performance and synchronization. Both steps will require you record the “key” to add to the respective ScienceLogic credential. You will need administrative access to your PagerDuty account.
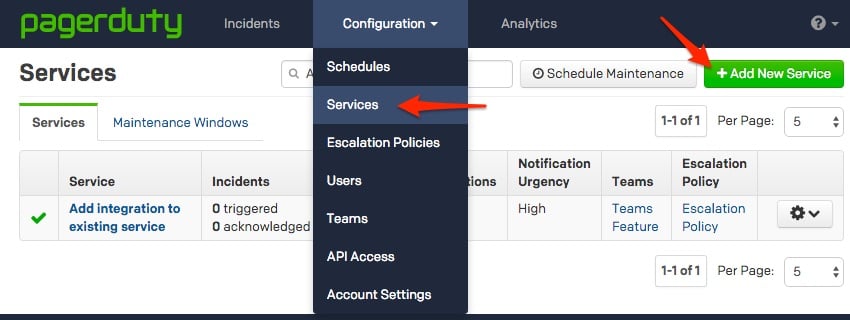
- From the Configuration menu, select Services.
- On your Services page: If you are creating a new service for your integration, click +Add New Service. If you are adding your integration to an existing service, click the name of the service you want to add the integration to. Then click the Integrations tab and click the +New Integration button.

- Select your app from the Integration Type menu and enter an Integration Name.If you are creating a new service for your integration, in General Settings, enter a Name for your new service. Then, in Incident Settings, specify the Escalation Policy, Notification Urgency, and Incident Behavior for your new service.
- Click the Add Service or Add Integration button to save your new integration. You will be redirected to the Integrations page for your service.
- Copy the Integration Key for your new integration:

Note: You may create multiple integrations for use with different PagerDuty policies. The ScienceLogic PagerDuty Power-Pack can be aligned to any number of different PagerDuty accounts and services.
Add API Access Key (for Dynamic Application)
- From the Configuration menu, select API Access.

- On your API Access page, click the +Create New API Key button.

- In the dialog that pops up, you'll be prompted to enter a Description for your key. You will also have the option to create the key as Read-only; leaving this box unchecked will create a full access key.
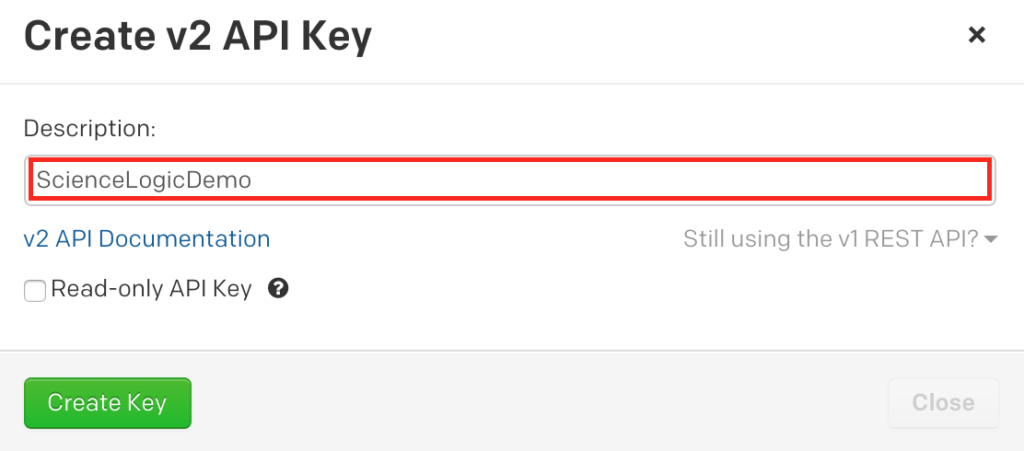
- Once you have filled in your options, click Create Key.
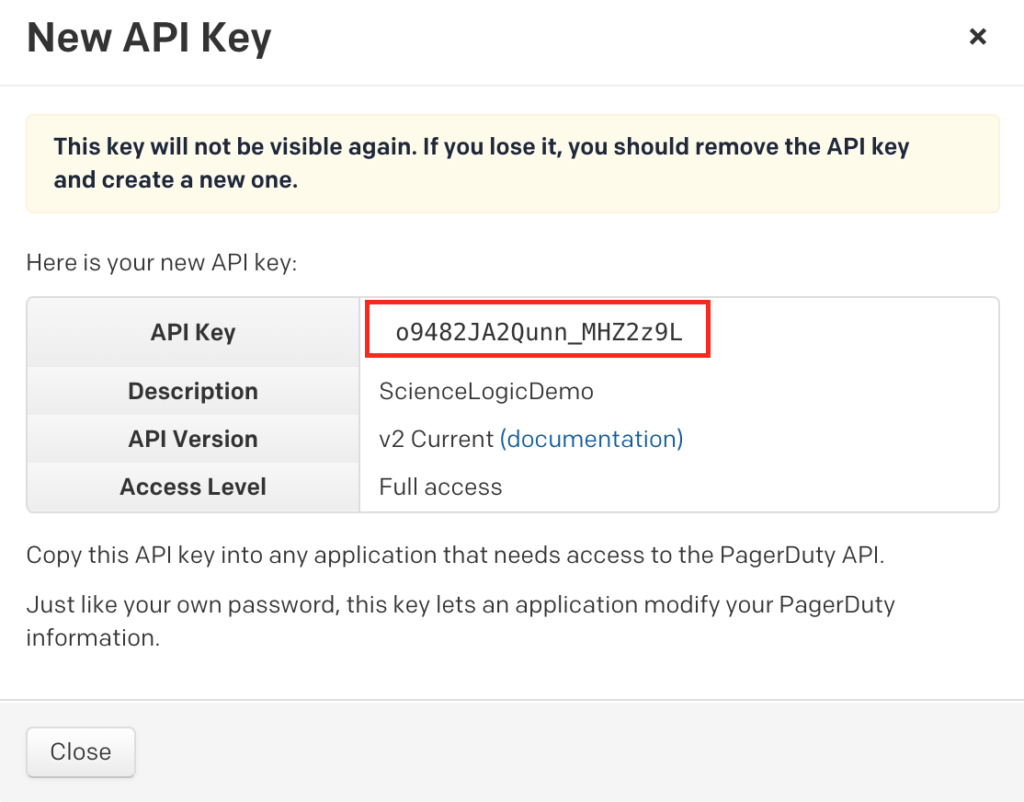
- Once you click Create Key, you will see a dialog displaying your key and confirming the options you filled in on the previous step. Make sure to copy this key into any application that needs it now, as you will not have access to the key after this step. If you lose a key that you created previously and need access to it again, you should remove the key and create a new one. Click Close once you have successfully copied your key.
In ScienceLogic EM7
Importing the PagerDuty Power-Pack
Overview
In this section we will install the PagerDuty Power-Pack and then configure both the Run Book Automation credential and the Dynamic Application credential.
Installation
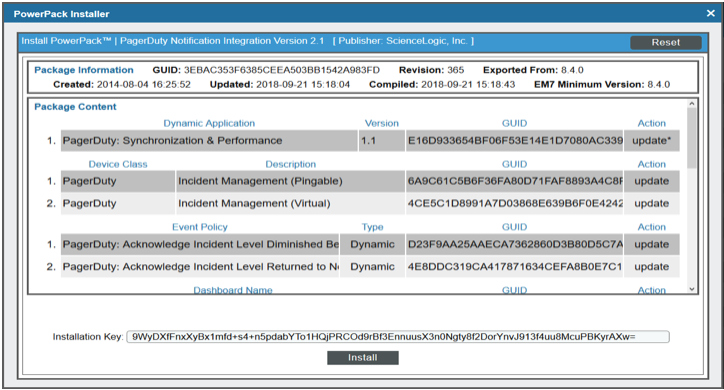
Obtain the latest copy of the “PagerDuty Integration” Power-Pack. In this document we will be using version 2.1 of the PowerPack.
- Using normal Power-Pack installation procedures, go to the System tab, select Manage, select Power-Packs.
- Select the Action button, and select Import Power-Pack.
- Locate the Power-Pack file, and then select the Import button. Click Install to begin the import process.
Once the Power-Pack is installed, proceed to the next section to configure the credential.
Configure RBA Credential
With the Power-Pack installed, we can now configure our Run Book Automation credential.
- Navigate to the System tab, select Manage, select Credentials.
- Locate the PagerDuty | RBA Proxy Example credential and then check on the wrench to edit it.
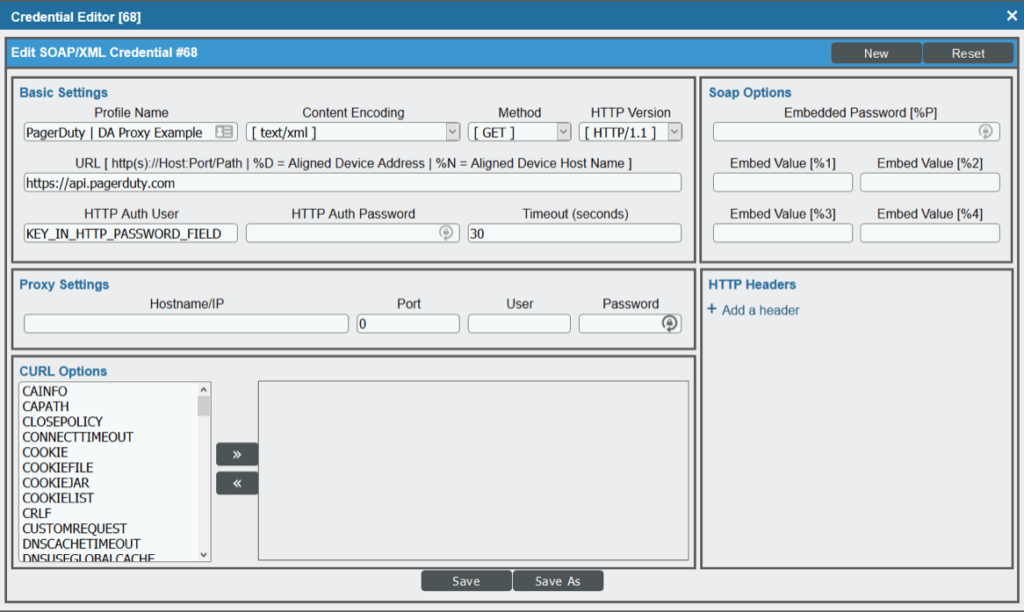
- Enter a new name in the Profile Name field.
- In the HTTP Auth Password field, enter the PagerDuty integration key you copied from the previous chapter.
- If your environment requires that HTTP requests from your SL1 system to the PagerDuty API use a proxy, supply values in the Proxy Settings section of the Credential Editor.
- Click the Save button to update the credential, or use the Save As button to create a new credential.
Configure Dynamic Application Credential
The Dynamic Application credential is needed if you wish to synchronize incident changes from PagerDuty to ScienceLogic.
- Navigate to the System tab and select Manage, then select Credentials.
- Locate the PagerDuty | DA Proxy Example credential and then check on the wrench to edit it.

- Enter a new name in the Profile Name field.
- In the HTTP Auth Password field, enter the PagerDuty API Key you copied from the previous section.
- If your environment requires that HTTP requests from your SL1 system to the PagerDuty API use a proxy, supply values in the Proxy Settings section of the Credential Editor.
- Click the Save button to update the credential, or use the Save As button to create a new credential.
Configure Run Book Automation Policies
Importing the PagerDuty Power-Pack
Overview
In this section we will configure the PagerDuty Run Book Automation Policy, aligning the credential, and begin sending events to PagerDuty. The Run Book Automation policies provided by ScienceLogic will create outbound incidents in PagerDuty.
Run Book Actions
Navigate to the Run Book Actions page by clicking on Registry tab, then Run Book, and then Actions. You will notice three PagerDuty actions:
- PagerDuty Trigger Incident
- PagerDuty Acknowledge Incident
- PagerDuty Resolve Incident
Each of these actions performs a different function and allows you to align different Automation policies based on your business needs. To configure these actions, we must manually edit each and align the proper PagerDuty credential that contains the PagerDuty Integration key.
- Navigate to the Registry, select Run Book, select Actions.
- Edit each Action by clicking on the wrench, then select the PagerDuty Credential, then select Save.
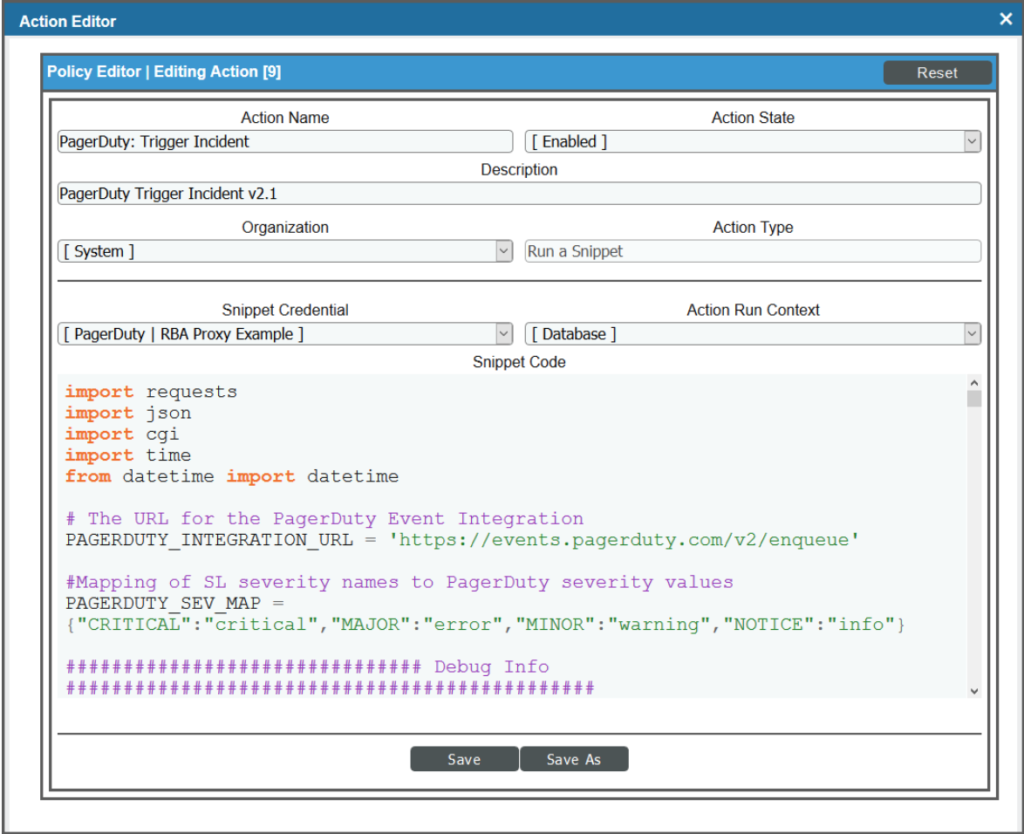
Note: PagerDuty Actions must run on the ScienceLogic Database, double check that the Action Run Context is set to Database. Once complete, let's double-check the PagerDuty Automation Policies.
Automation Policies
Like the PagerDuty Run Book Actions, there are three Automation Policies. Each Automation Policy performs a different task based on criteria established in the Policy. By default the PagerDuty Automation Policies are very broad, allowing every ScienceLogic event that has a severity higher than or equal to “minor” to trigger a PagerDuty incident. Although this may be good to begin testing your PagerDuty integration, it is advised to adjust each PagerDuty Automation policy to meet the needs of your business.
- Navigate to the Run Book Automation page by clicking on Registry tab, then Run Book, and then Automation.
- Click the wrench for each policy to edit it.
- Optionally, edit one or more fields to adjust which events will match the policy and trigger the associated action. The default policies match all events with a severity of “minor” and higher on all devices in all organizations. When done making changes, click the Save button.
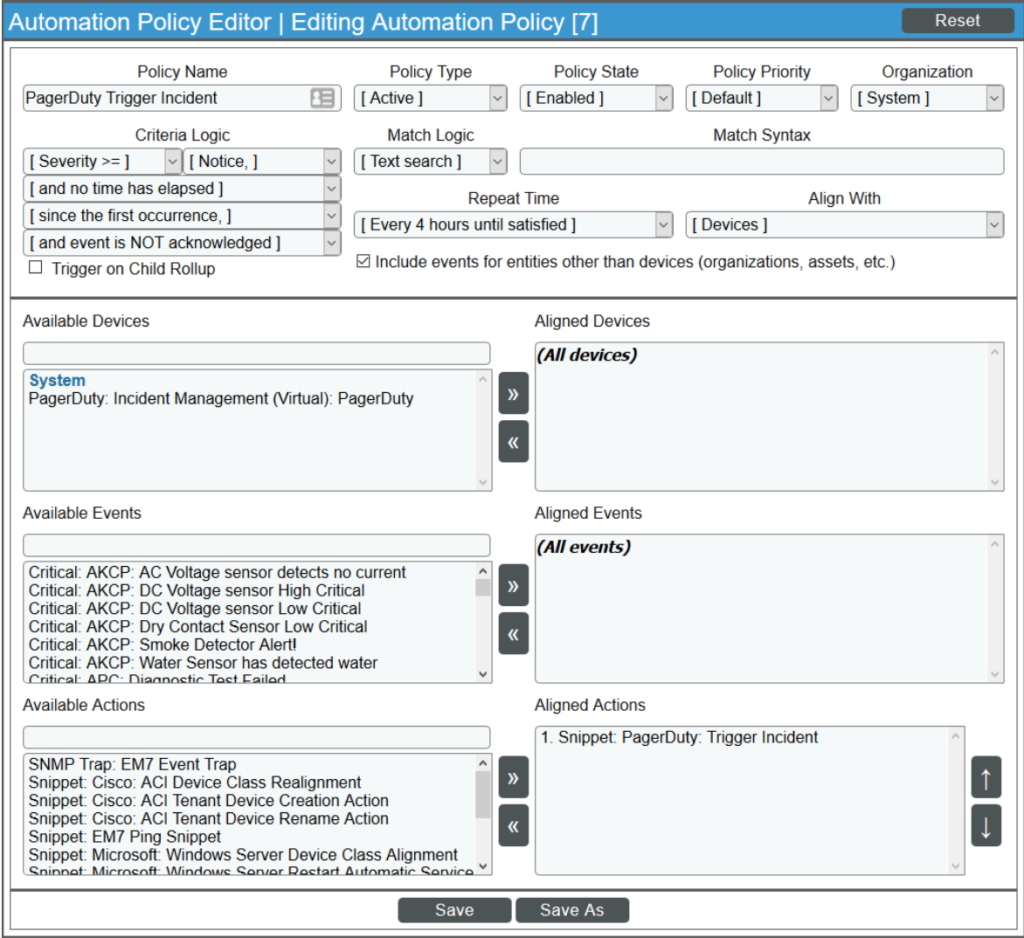
To prevent your changes to an Automation Policy from being overwritten when the PagerDuty PowerPack is updated, you must remove it from the PowerPack.
- Navigate to System, then Manage and then PowerPacks.
- Click the wrench icon for the PagerDuty Notification Integration PowerPack.
- In the Editing PowerPack window, go to Contents and then Run Book Policies.
- Click the Bomb Icon for each Automation Policy you edited.
Note: It is not recommended that you remove the Automation Actions from the PowerPack even though you edited the Automation Action to change the aligned credential. If you remove an Automation Action from the PowerPack, any functional changes made to the Automation Action code will not be installed on your system when the PowerPack is updated.
Configure PagerDuty Device and Dynamic Application
Overview
In this section we will create a PagerDuty device, and manually align the PagerDuty Synchronization and Performance Dynamic Application. The Synchronization and Performance Dynamic Application provided by ScienceLogic will provide near-real time performance data regarding your PagerDuty service, as well as synchronize changes emanating from PagerDuty.
Create PagerDuty Device
Although the PagerDuty Dynamic Application may be aligned to any ScienceLogic device, in this section we will walkthrough creating a dedicated PagerDuty device.
- Navigate to Registry, then Devices and then Device Manager.
- Click the Actions button and select Create Virtual Device.
- Supply values in the following fields:
- Device Name. Enter a name for the device.
- Organization. Select an organization for the device.
- Device Class. Select “PagerDuty | Incident Management (Virtual)”.
- Collector. Select the Collector Group that will perform collection for this device.
- Click Add.
Align Dynamic Application
To align the PagerDuty Synchronization and Performance Dynamic Application:
- Navigate to Registry, then Devices and then Device Manager.
- Next, click the wrench icon for the device with which you want to align the Dynamic Application.
- Click the Collections tab, then click the Actions button and select Add Dynamic Application.
- In the Dynamic Application Alignment modal page, select values in the following fields:
- Dynamic Applications. Select “Pager Duty Synchronization and Performance”.
- Credentials. Select the credential you created that includes the API Key for PagerDuty.
Once aligned, the Dynamic Application will run every 15 minutes looking for updates to existing ScienceLogic events and updating performance data.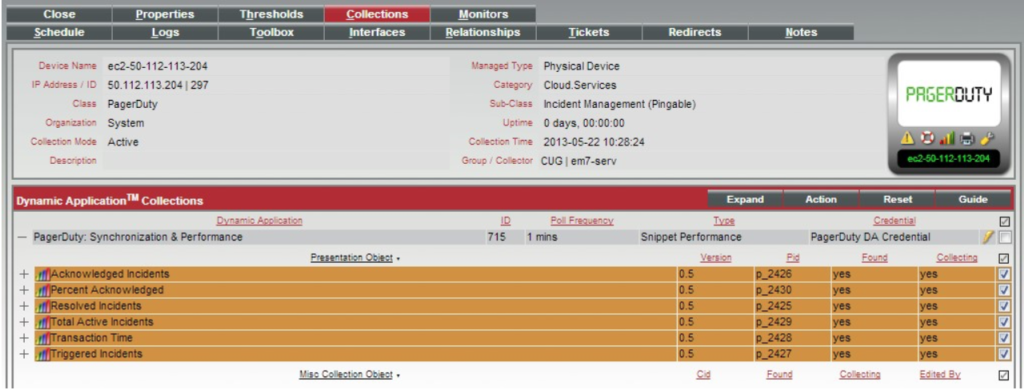
To increase the frequency of execution, select the checkbox for the PagerDuty Synchronization and Performance Dynamic Application, select a new value in the Poll Frequency section of the Select Action field, and then click the Go button.
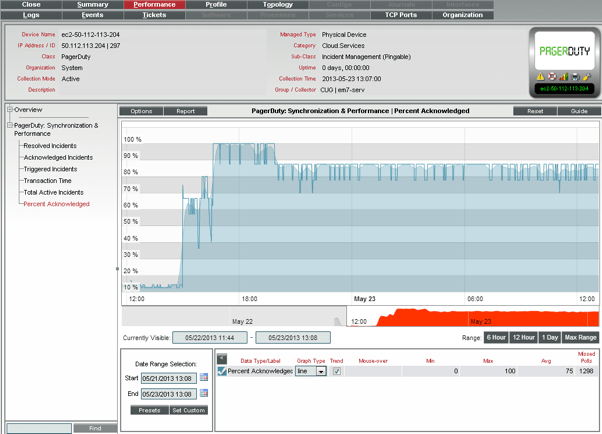
To view the performance metrics collected by the Dynamic Application, click the graph icon, go to the Performance tab, and expand PagerDuty Synchronization and Performance in the left NavBar: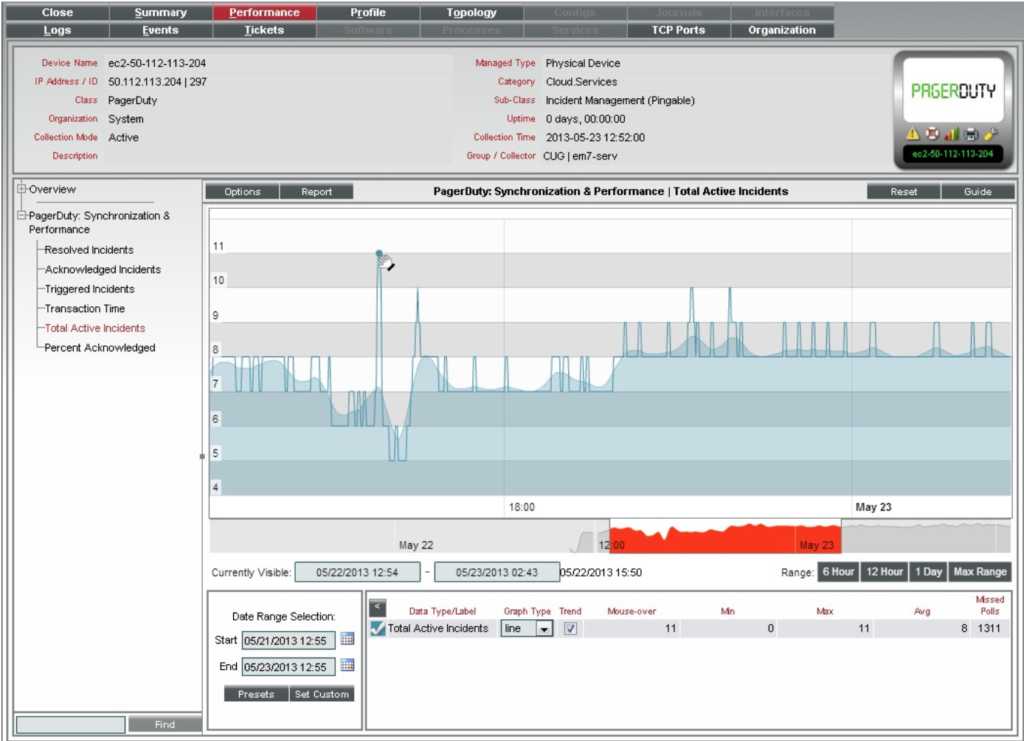
Using PagerDuty Integration
Run Book (Forward Synchronization)
Every ScienceLogic event that matches the PagerDuty Run Book Automation policy will create a new PagerDuty incident. Once an incident is created, notification and escalation policies on the Pager Duty system will go into effect.
ScienceLogic’s Run Book Automation integration is a forward synchronization process, meaning that events and activities emanate from the ScienceLogic system to the PagerDuty service system. Just as new ScienceLogic events will create new PagerDuty incidents, acknowledging or clearing events from within ScienceLogic’s event monitor will perform the same function via the PagerDuty API.
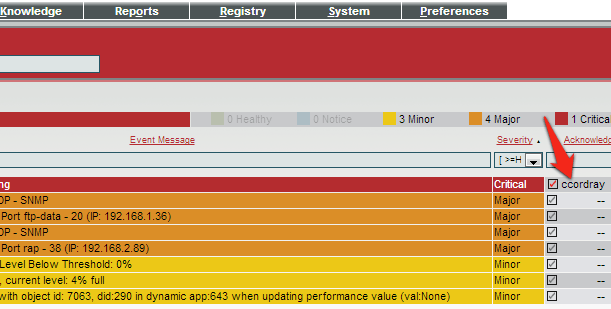
Acknowledging incidents from the PagerDuty service portal will only update events in ScienceLogic if the PagerDuty Synchronization and Performance Dynamic Application is configured. If events are auto cleared by ScienceLogic, because either the event has timed-out or the system no-longer detects there’s still a problem, events will also be automatically resolved in PagerDuty. The below example shows a ScienceLogic Event Console with several different active events. The same events are synchronized in PagerDuty as triggered incidents.


Note: For this example all events are creating incidents in PagerDuty, which is a function of the ScienceLogic Run Book Automation policy and can be adjusted to meet the needs of your business.
Since PagerDuty requires a unique incident ID to de-duplicate events, ScienceLogic uses the device ID, called the DID, to help eliminate duplicate event storms for a single device. If a device has multiple events, the parent event (usually the highest severity event) will be used for the PagerDuty incident. If subsequent events appear after the initial event correlation process by ScienceLogic (usually time based), the new event will update the PagerDuty incident with the new description.
When events are acknowledged in ScienceLogic, the acknowledged status will be synchronized to PagerDuty. This process can take up to 60 seconds.
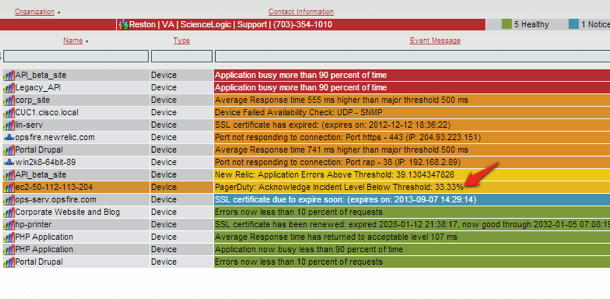
Once synchronized the status of the PagerDuty incident is updated. Resolving an event in the ScienceLogic event monitor also updates the status of the Incident in PagerDuty.
Acknowledging in PagerDuty (Reverse Synchronization)
Incidents that are acknowledged in the PagerDuty portal or Smart Phone applications will synchronize back to ScienceLogic if the PagerDuty Dynamic Application has been installed.
By default, synchronization can take up to 15 minutes, however users can change the frequency be editing the Dynamic Application properties. In order to maintain continuity of user assignment, ScienceLogic matches the PagerDuty assigned username to the ScienceLogic username. If there is a match ScienceLogic events will be updated to matching PagerDuty incidents. If no username can be found, no updates will be made.
For instance, if the username in ScienceLogic is “jdoe”, the same username must exist in PagerDuty for the reverse synchronization process to update events in ScienceLogic. The primary reason for this is because of ScienceLogic uses advanced auditing and change control process that must know which user account is acknowledging events.
PagerDuty Interface
In PagerDuty, any ScienceLogic created incident will have additional notes and details about the event. The details include information about the device, including the last occurrence, severity, and IP address. Users can also navigate from PagerDuty to ScienceLogic by clicking the Client URL link.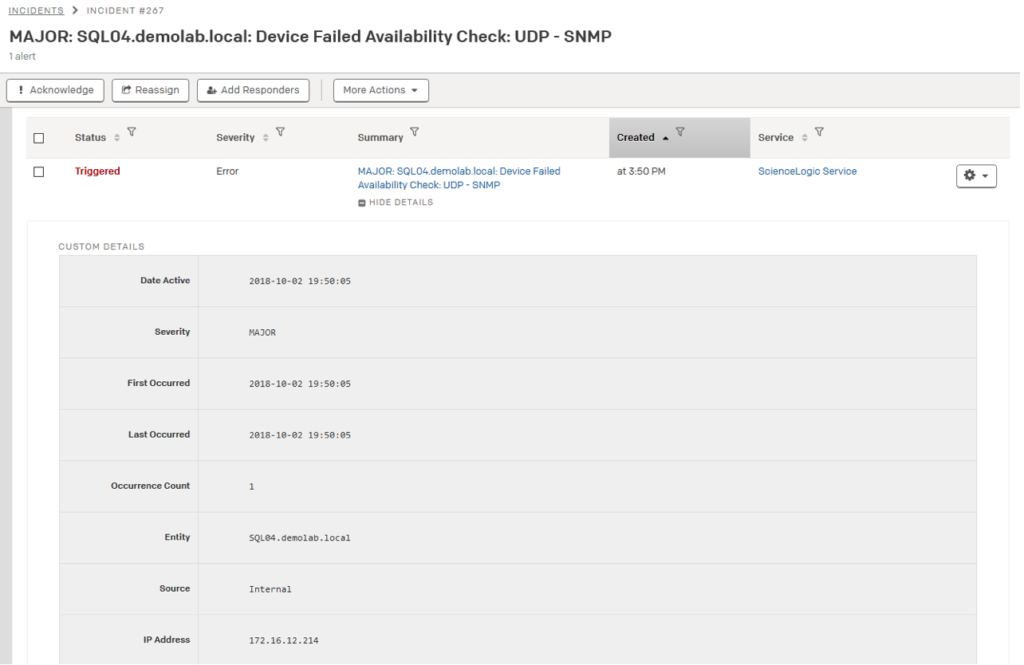
Performance Metrics and Dashboard
If the “PagerDuty Synchronization & Performance” Dynamic Application is installed, users can see several different performance metrics, including:
- Number of Resolved Incidents
- Number of Acknowledged Incidents
- Number of Triggered Incidents
- Transaction Time of PagerDuty API Requests
- Number of Active Incidents (Acknowledged + Triggered)
- Percentage of Acknowledged Incidents
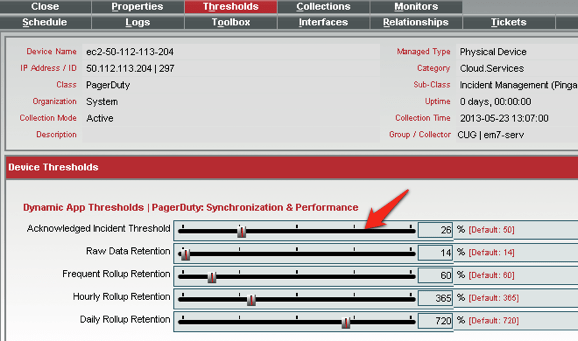
In addition to the above performance metrics, the “Percentage of Acknowledged” metric also has an alarm threshold that can be adjusted to meet the needs of your environment. The threshold value can be set on the Device Properties > Thresholds tab.
In addition to performance metrics and alerts, the ScienceLogic PagerDuty solution provides an interactive performance dashboard. In case you have multiple PagerDuty accounts, the dashboard will support multi-tenancy allowing a consolidated view of all PagerDuty performance metrics.
Advanced Configuration and Troubleshooting
Distributed Architecture Implementation
For distributed ScienceLogic implementations, special setting must be made in order for the PagerDuty Synchronization & Performance Dynamic Application to work. Edit the Dynamic Application from the System > Applications page. Click the yellow wrench next to the “PagerDuty: Synchronization & Performance” application. After the browser window opens, click on the “Snippet” tab. Click on the yellow wrench next to the Snippet in the Snippet Registry.
The following variables must be changed to reflect your environment.
- MASTER_DATABASE_USER="<your username>"
- MASTER_DATABASE_PASSWD="<your password>"
- MASTER_DATABASE_HOST="192.168.2.87"
- MASTER_DATABASE_PORT=7706
Change the MASTER_DATABASE_HOST to the IP address of the ScienceLogic central database server. If the username or password is different than the default, change those as well.The collector must be able to communicate with the central database server. As a result, port 7706 must be open. This can be validated by testing the MySQL connection from the collector’s command line.
mysql --host=192.168.2.87 --port=7706 –u root -pIf you get “ERROR 1130: Host is not allowed to connect to this MySQL server”, you will need to allow a specific client IP address (for example: 192.168.1.4) to access the MySQL database.Logon the Central Database CLI or use the DB Tool in the UI.
mysql> use mysql;
mysql> GRANT ALL ON *.* to root@'192.168.1.4' IDENTIFIED BY 'your-root-password';
mysql> FLUSH PRIVILEGES;
Lastly, update firewall rules to make sure TCP port 7706 is open on the Central Database. In our testing of ScienceLogic 7.3.0, the port 7706 was found to be open.
Audit Logging
When an event is acknowledged or resolved in ScienceLogic (event monitor or auto-clear), it runs the matching RBA policy and tells the PagerDuty API to acknowledge/resolve the matching incident. The PagerDuty API does not support any fields to indicate who acknowledged the incident; as a result API acknowledged incidents show up as “Through the API".Although this is normal behavior, ScienceLogic also provides audit logging of who on the ScienceLogic system acknowledges or resolves an incident. This is available by navigating to the Incident Log of any incident.
Need some help?
Please contact us if you require further assistance in getting set up.
Ready to get started?
Try any product on the Operations Cloud for free.
No credit card required.
