- PagerDuty /
- Integrations /
- Sensu Core Integration Guide
Sensu Core Integration Guide
Sensu is an open source monitoring framework for servers, services, application health, and business KPIs. Sensu was designed from the ground up to monitor systems in the cloud, such as AWS EC2 instances, and to discover systems rather than have them specified in your configuration beforehand.
This guide will walk you through the process of integrating Sensu Core with PagerDuty. If you have any trouble completing the integration please contact us.
Note: The steps in this guide are for Sensu Core, the free version of Sensu. The Enterprise version features a built-in PagerDuty integration which is officially supported by Heavy Water, so we recommend following the steps in our
Sensu Enterprise Integration Guide if you are using Sensu Enterprise.
If you haven't already, we highly recommend switching to Python 3 to use this integration. At this time, CentOS 5 is not supported by the Sensu Core integration.
In PagerDuty
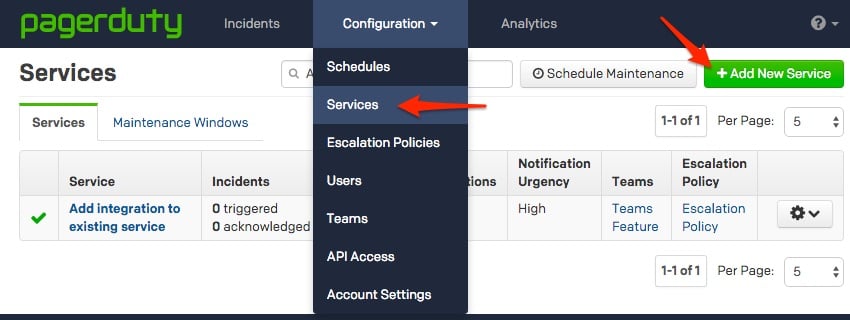
- From the Configuration menu, select Services.
- On your Services page:
If you are creating a new service for your integration, click +Add New Service.
If you are adding your integration to an existing service, click the name of the service you want to add the integration to. Then click the Integrations tab and click the +New Integration button.


-
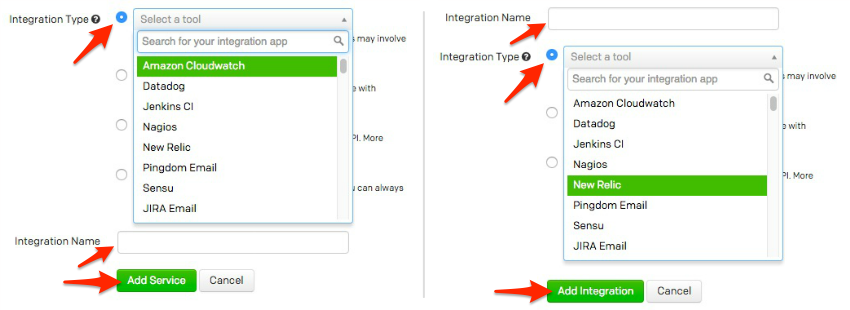
Select Sensu from the Integration Type menu and enter an Integration Name.
-
Click the Add Service or Add Integration button to save your new integration. You will be redirected to the Integrations page for your service.

On Your Sensu Server
This guide was written and tested on Ubuntu 16.04 and Amazon Linux 2016.09, with Sensu 0.20.2-1 and 0.26.5-2. Paths may be different for other operating systems or Sensu versions. Note that all commands provided are intended to be run as the root user.
- Install the PagerDuty Agent. The agent receives events from Sensu and sends them to PagerDuty using a queue, provides logging that helps troubleshoot any problems, and automatically retries sending alerts in the event of any connection failure (i.e. if your Sensu node temporarily loses connectivity).
- Save the PagerDuty handler configuration to your Sensu installation's conf.d directory:
wget -O /etc/sensu/conf.d/pagerduty_handler.json https://raw.githubusercontent.com/PagerDuty/pdagent-integrations/master/conf.d/sensu_pagerduty_handler.json - Modify the configuration file to have your integration key obtained in step 5 of the above section:
/etc/sensu/conf.d/pagerduty_handler.json { "handlers": { "pagerduty": { "type": "pipe", "command": "/usr/share/pdagent-integrations/bin/pd-sensu -k YOUR-INTEGRATION-KEY-HERE" } } } - If you want to make PagerDuty a default handler, meaning any check without a specific handler defined will notify PagerDuty when there is an alert, open the default handler configuration file and add
pagerdutyto the set of handlers:
/etc/sensu/conf.d/default_handler.json
      {
      "handlers": {
      "default": {
      "type": "set",
      "handlers": [
      "pagerduty"
      ]
    }
  }
}
If you do not want PagerDuty to be a default handler, meaning you only want alerts from specifically defined checks to be sent to PagerDuty, open the configuration file for each check you want to send alerts to PagerDuty and add
pagerdutyto the check's handlers:/etc/sensu/conf.d/YOUR-CHECK.json { "checks": { "YOUR-CHECK-NAME": { "command": "YOUR-CHECK-COMMAND", "subscribers": [ "YOUR-SUBSCRIBERS" ], "interval": YOUR-INTERVAL, "handlers": ["default", "pagerduty"] } } } - Restart Sensu for your configuration changes to take effect:
service sensu-server restart; service sensu-client restart
Verify the Integration Works
- Create a standard check that monitors the cron service as outlined in the Sensu guide, Getting Started with Checks. Your check will look like this if you made PagerDuty a default handler as outlined in step 2 above:
/etc/sensu/conf.d/check_cron.json
{
  "checks": {
    "cron": {
      "command": "/etc/sensu/plugins/check-process.rb -p cron",
      "subscribers": [
      "test"
      ],
      "interval": 60,
      "handlers": "default"
    }
  }
}
If you did not make PagerDuty a default handler, you'll need to specify
pagerdutyas a inhandlerslike this:"handlers": ["default", "pagerduty"] - Restart Sensu for your configuration changes to take effect:
service sensu-server restart - Confirm that Sensu is working, the cron check you've created is OK, and there are no other alerts that have been triggered. Your Dashboard should look like this:

- Stop the cron service:
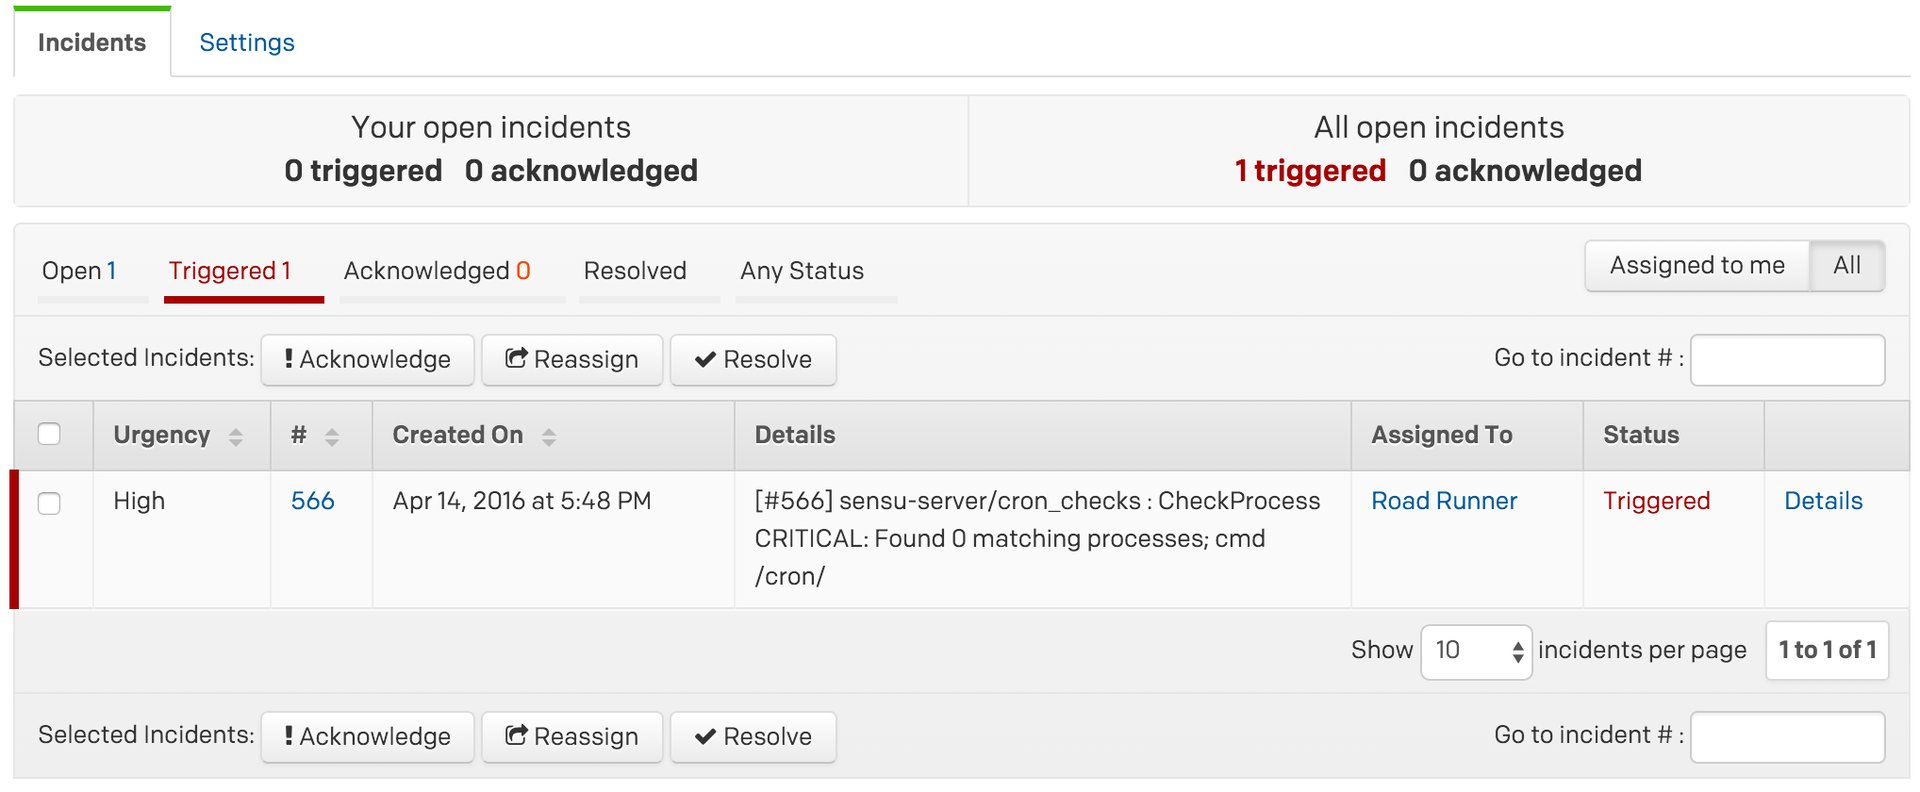
service cron stop - Within 60 seconds you should see an alert in Sensu and a new incident triggered in PagerDuty:


FAQ
Can I configure Sensu Core to work with multiple PagerDuty services?
Yes. You can do this by creating multiple handlers, as follows:
- Choose new names for each handler, i.e. pagerduty1, pagerduty2 etc.
- Make differently-named copies of the file pagerduty1_handler.json, pagerduty2_handler.json, etc.
- In each file:
- Change "pagerduty" to the new distinct name
- Change the integration key to the distinct integration key of the service the handler will be used for in PagerDuty.
- Specify, for various different checks, the distinct PagerDuty handler to use, by its name, i.e.:
/etc/sensu/conf.d/YOUR-CHECK.json
{
  "checks": {
    "YOUR-CHECK-NAME": {
      "command": "YOUR-CHECK-COMMAND",
      "subscribers": [
      "YOUR-SUBSCRIBERS"
      ],
      "interval": YOUR-INTERVAL,
      "handlers": ["default", "pagerduty1"]
    }
  }
}
Ready to get started?
Try any product on the Operations Cloud for free.
No credit card required.
