- PagerDuty /
- Integrations /
- Zenoss 4 Integration Guide
Zenoss 4 Integration Guide
Zenoss is a very popular open source network, server and application monitoring system used by thousands of IT organizations. It provides one of the best event management systems available in any open source monitoring system. The plug-in architecture of Zenoss allows it to be extensible by anyone.PagerDuty extends Zenoss’s functionality by providing on-call scheduling, alerts and incidents tracking through the PagerDuty API. You are notified of the most critical Zenoss events by PagerDuty so you are able to take immediate action.
This guide describes how to integrate your Zenoss 4 installation with the PagerDuty ZenPack. You might need to slightly alter these instructions depending on your exact Linux distribution and your Zenoss configuration. If you are having trouble completing the installation, please contact us.
Looking for Zenoss 5? Go here
Looking for Zenoss 3? Go here
In PagerDuty
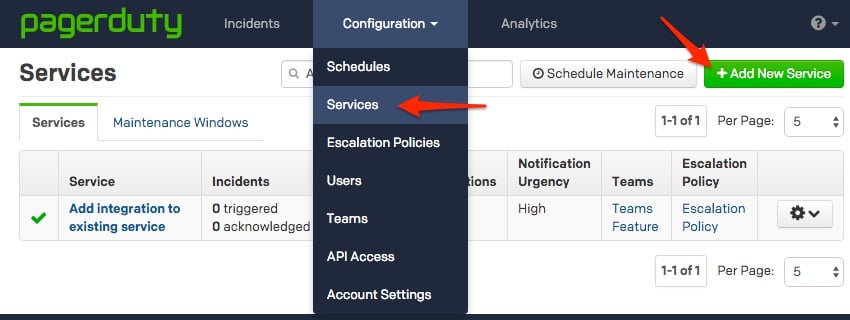
- From the Configuration menu, select Services.
- On your Services page:If you are creating a new service for your integration, click +Add New Service.
If you are adding your integration to an existing service, click the name of the service you want to add the integration to. Then click the Integrations tab and click the +New Integration button.


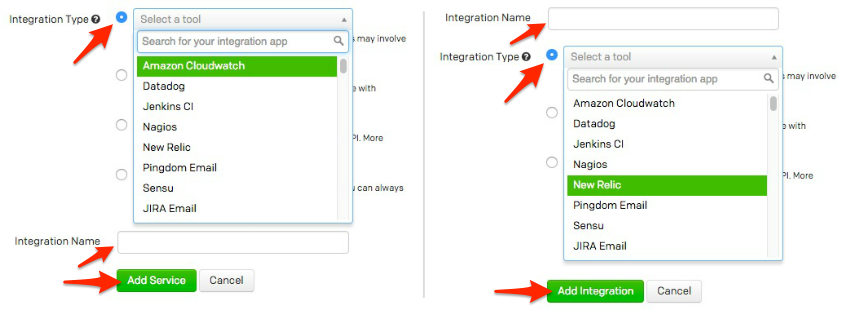
- Select your app from the Integration Type menu and enter an Integration Name.If you are creating a new service for your integration, in General Settings, enter a Name for your new service. Then, in Incident Settings, specify the Escalation Policy, Notification Urgency, and Incident Behavior for your new service.
- Click the Add Service or Add Integration button to save your new integration. You will be redirected to the Integrations page for your service.

- Copy the Integration Key for your new integration:

Note: You may create multiple Generic API integrations for use with different PagerDuty policies. Zenoss 4 can be aligned to any number of different PagerDuty accounts and Generic API integrations.
In Zenoss 4:
- Login to your Zenoss server's shell as root. Open the /opt/zenoss/etc/zenactiond.conf file within your text editor. Update the zopeurl parameter to the URL that you use to access your Zenoss web interface. This parameter will be used to directly link from your PagerDuty console to your Zenoss web interface. Note: This can be an intranet URL. Make sure to remove the # symbol from this parameter so that the field is activated.
- From your web browser, download the PagerDuty ZenPack to your local workstation. Note: Do not change the name of this file.
- From the Zenoss web interface, go to ADVANCED > Settings > ZenPacks > Click on the Gear Icon > Install ZenPack:

- Select the PagerDuty ZenPack that you downloaded and click OK.

- Restart Zenoss. From a shell:
sudo -u zenoss /opt/zenoss/bin/zenoss restartYou will now see PagerDuty under ADVANCED > Settings:
- Select this new PagerDuty option. You can then enter your PagerDuty subdomain and API key then press enter. For more information on API Access Keys, read this knowledge base article. Note: You will not use the service API key here. Please read the aforementioned article for more information.

Note: Once you hit the Apply button, the list of all PagerDuty Generic API services will populate. If your service does not show up, confirm your settings and verify that your services is of type Generic API within PagerDuty. - Go to EVENTS > Triggers and click on the + button to add a trigger.

- Enter an Id for your trigger. We're using PagerDuty, but you may want to use something more descriptive, such as "Critical Alert." Click the SUBMIT button once you've entered an Id.

- Select your trigger and click on the gear icon to configure it.

- Configure the trigger to the rule(s) that you would like to trigger alerts within PagerDuty. Once you have completed configuring your rule(s), click on the SUBMIT button.

- Click on Notifications from the left-hand menu, then click on the + icon to add a new notification.

- Enter an Id for the notification, and select PagerDuty for the Action. In this example we use PagerDuty for the id, although you may want to use something more descriptive. Click on the SUBMIT button once the form is complete.

- Select your new notification and click on the gear icon to configure it.

- Check the Enabled box, then select the trigger that you made earlier, then click the Add button. The trigger should show up in the lower box under Triggers.

- Click on the Content tab. Now select the PagerDuty service from the drop-down menu. Note: You can also type the service name. This is the service that will get notified when an alert is triggered within Zenoss. If you are connecting to multiple PagerDuty services from Zenoss, this is where you would select the different services. The PagerDuty ZenPack will automatically populate the remaining fields. Many of these fields are customizable. For a full list of available variables, check the FAQ. Click the SUBMIT button once you're finished.

Post Installation
To verify that everything is working, you'll want to trigger a new alert within Zenoss, which will in-turn trigger an incident within PagerDuty. When viewing the details for an incident, you can use the View in Zenoss link to take you to the event within your Zenoss web interface.
FAQ
Why did I receive this error "Failed to Install ZenPack ZenPacks.PagerDuty.APINotificiation-1.0.0-py2.71.egg. See event.log for details" when installing the ZenPack?
This is an issue with the version of Python that you have installed. You can either install the ZenPack from source or change the filename from "ZenPacks.PagerDuty.APINotification-1.0.0-py2.71.egg" to "ZenPacks.PagerDuty.APINotification-1.0.0.egg" and then reinstall the ZenPack.
How do I setup Zenoss to work with multiple PagerDuty services?
This is easy to do with the current integration, as each Zenoss notification can be associated with a PagerDuty service. You would just need to add multiple notifications within Zenoss to tie to each of your PagerDuty services.
What if a Zenoss notification happens while my network is down?
If a PagerDuty server can’t be reached for any reason, Zenoss will re-send the notification to PagerDuty every 60 seconds. This is configurable under the notification configuration.
Since Zenoss needs my external Internet connection to send failure reports to PagerDuty, how will I receive notification if our site loses external connectivity?
You should configure an external ping check service to monitor your site’s external connectivity. Of course, you can use PagerDuty to forward alerts from these services.
I unacknowledged an alert within Zenoss, but PagerDuty still shows it as acknowledged, what happened?
PagerDuty does not support unacknowledged incidents. The event will remain as acknowledged within PagerDuty until it is resolved.
How can I customize the details of my alerts?
Other event properties can be found in Section 7.1.2 (Page 89) of the ZenOSS Core Administration Guide. Note: The Incident Key needs to be unique per incident.
How can I use a proxy to send notifications to PagerDuty?
You can do this by editing the ~zenoss/.bashrc file to include the http_proxy and https_proxy environment variables. The lines added would look like:
export http_proxy=http://my.proxyserver.com:3128/
export https_proxy=http://my.proxyserver.com:3128/
For the changes to take effect, you must either fully stop and start the Zenoss service or reboot the server.
Still need help?
Please contact us if you’re unable to sort out the difficulty.
Ready to get started?
Try any product on the Operations Cloud for free.
No credit card required.
